Microsoft launched their new operating system Windows 11 a few days ago. The interface of Windows 11 operating system is slightly different from Microsoft’s previous operating systems. The installation procedure remains the same as previous OS (WIN 10) installation but some options have been added like TPM 2.0 enable, Secure Boot enable etc. Today I will discuss the easiest and simplest installation method here. It is good to say that Microsoft has added many new features to Windows 11. We will discuss about the new features of Windows 11 on another blog. Today let’s just know how to do the installation process.
Which Computer is eligible for Windows 11? Basic hardware specification needed for Windows 11
You can simply check the Microsoft’s official windows 11 System requirements page by click here. Where you can get the basic idea of Hardware required for Windows 11.
But from my real-life experience I suggest the minimum hardware requirement of Windows 11 to make Windows 11 run smoothly You need minimum 4th gen (64 bit) intel core processor or Similar other brand, 8gb of RAM, minimum 128gb SSD (SSD is must important to run it smoothly), UEFI Boot supported Bios, TPM 2.0 must need for upgrade process but for fresh installation TPM 2.0 is optional.
There are two option to install Windows 11 on your PC
1. Upgrade Method
If you previously had an operating system like Windows 10 on your PC and you have bulk important data on your computer that you don’t want to move or you don’t have an option to move or copy, upgrading is a better option. you. To know how to upgrade your computer’s operating system to Windows 11 click here
What is the Upgrade method? Or How I Upgrade my PC to Windows 11?
2. Fresh Installation
How I install Windows 11 on my computer? (Fresh Installation)
Assuming your Newly owned or old computer have the hardware, specification which required for Windows 11 as describe before. Now the first thing you need to do is
a. Download the Windows 11 ISO file from Microsoft official website . To know step by step how to download the Windows 11 ISO file from Microsoft official website click here.
b. Prepare the Bootable Windows 11 Bootable Disk. To know step by step how to create a bootable Windows 11 Usb click here.
- 1. Plug-in the WINDOWS 11 bootable pen drive to your PC.
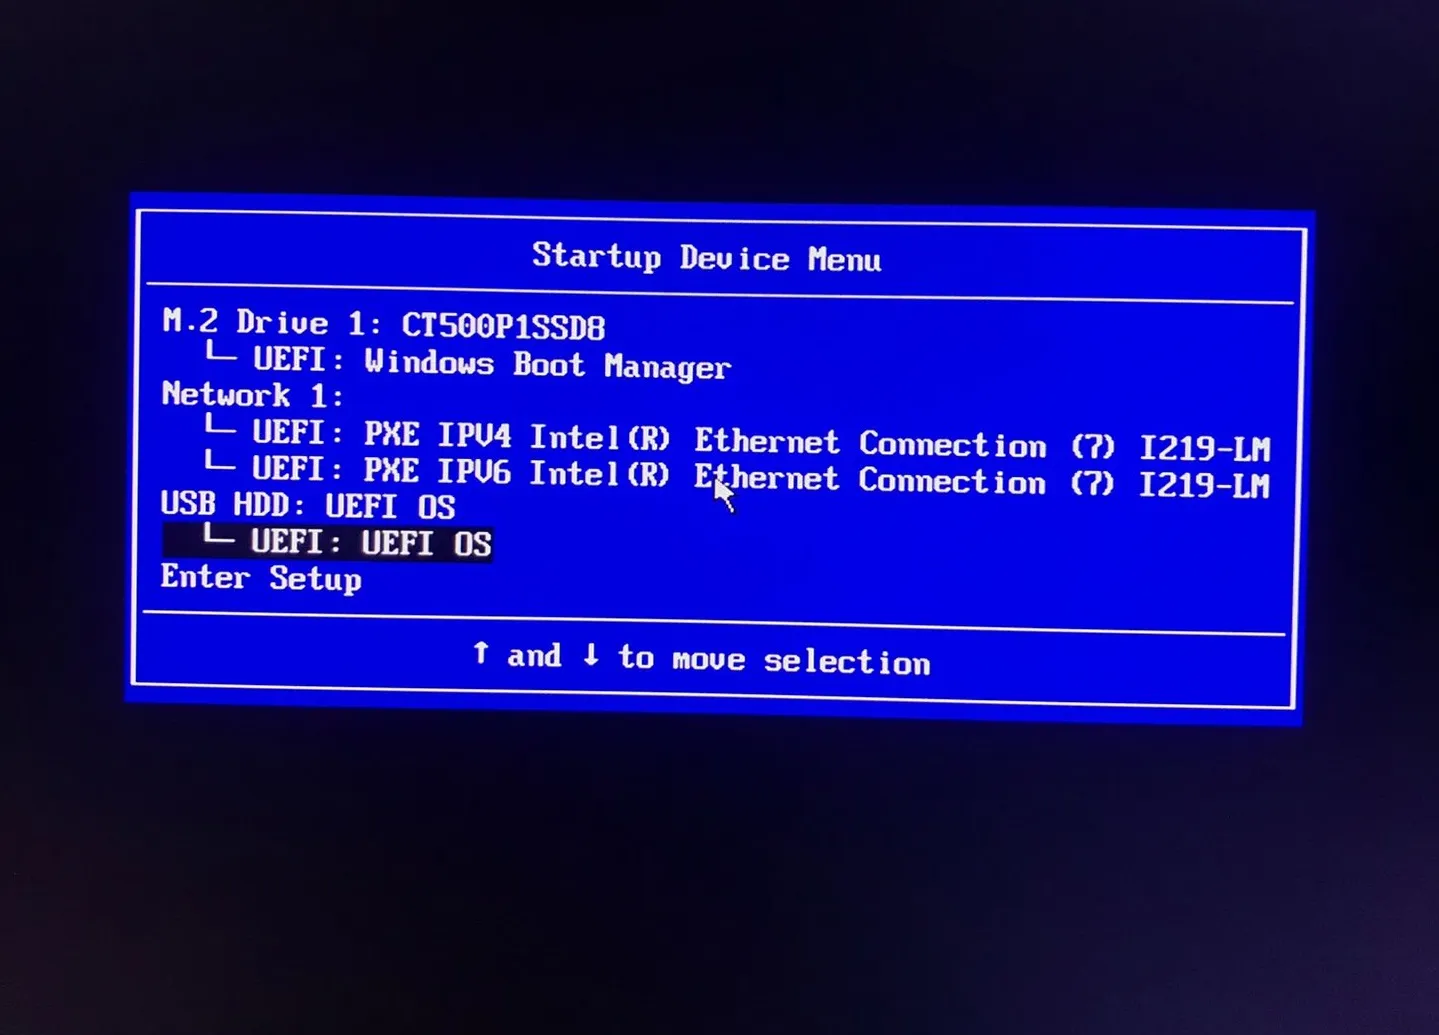
- 2. Turn on your PC and press the appropriate Boot menu Fn key .(For Lenovo / Dell / Acer – F12 , HP- F9 etc…If you install it on older version PC assuming you already enable the UEFI BIOS boot mode. Enable Secure mode and TPM 2.0 is optional. But you must create the bootable windows 11 pen drive as I describe on previous blog .)
- 3. After pressing the Boot menu key You will see the option like the picture below. ( Its may not exactly the same . Its depends on you PC hardware manufacturer)
- 4. Go to the ” USB HDD / USB Disk / USB External Disk ” option by pressing UP and Down key and Select it by pressing Enter key.
- 5. Before showing five dots press any key (Enter is preferred) from keyboard.( Option may not showing for some cases)
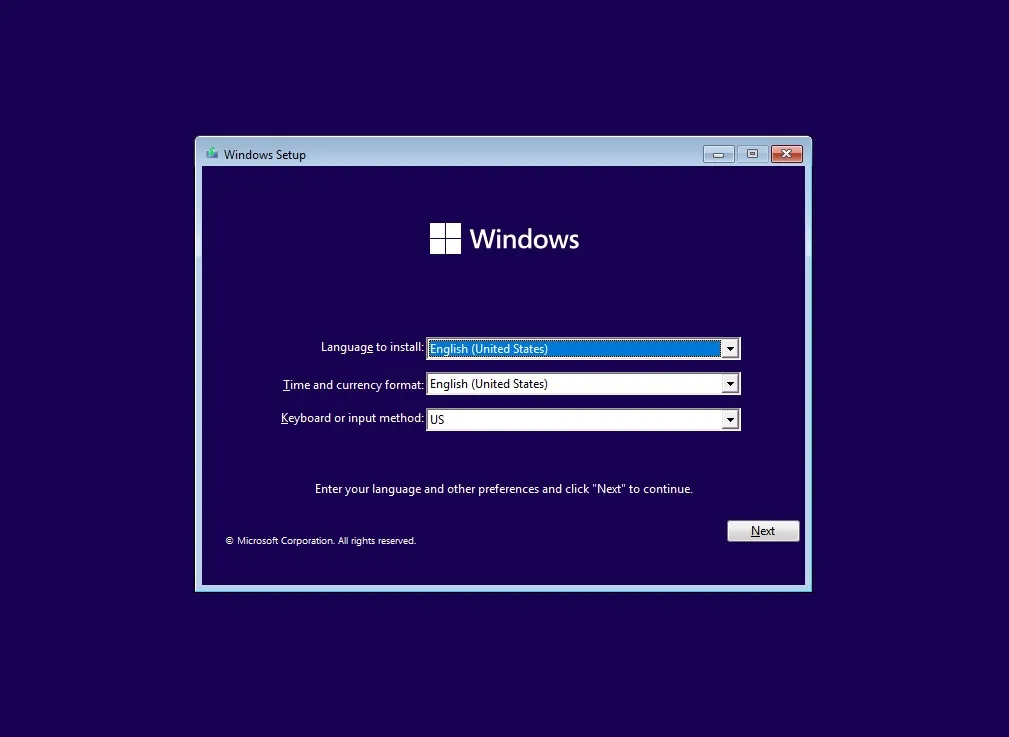
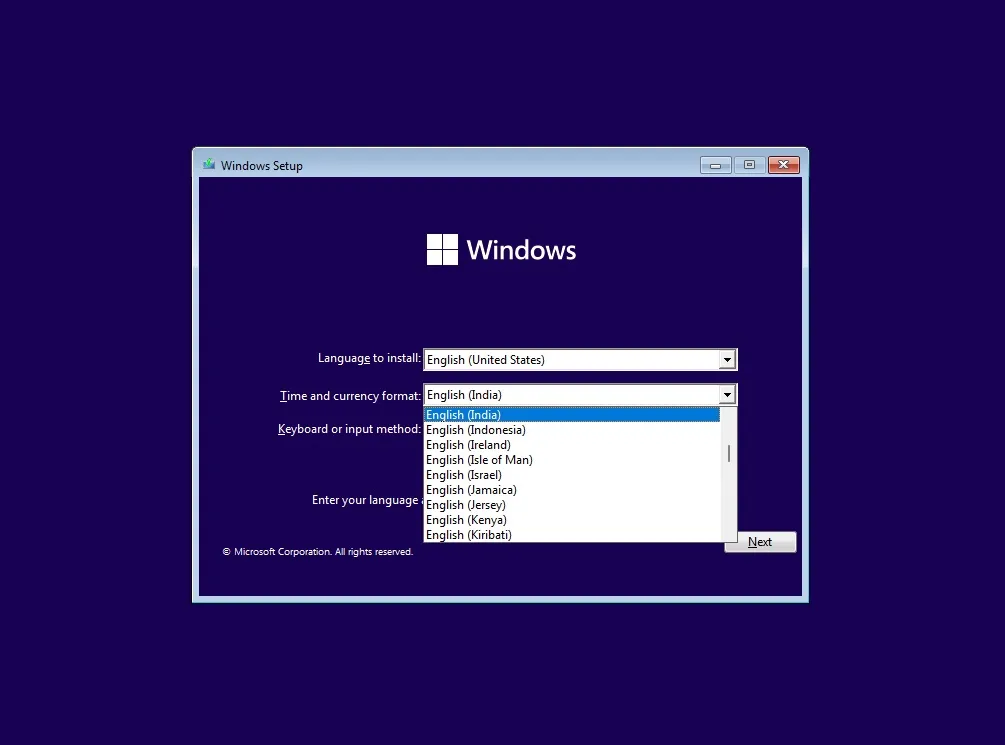
- 6. Select your preferred language.
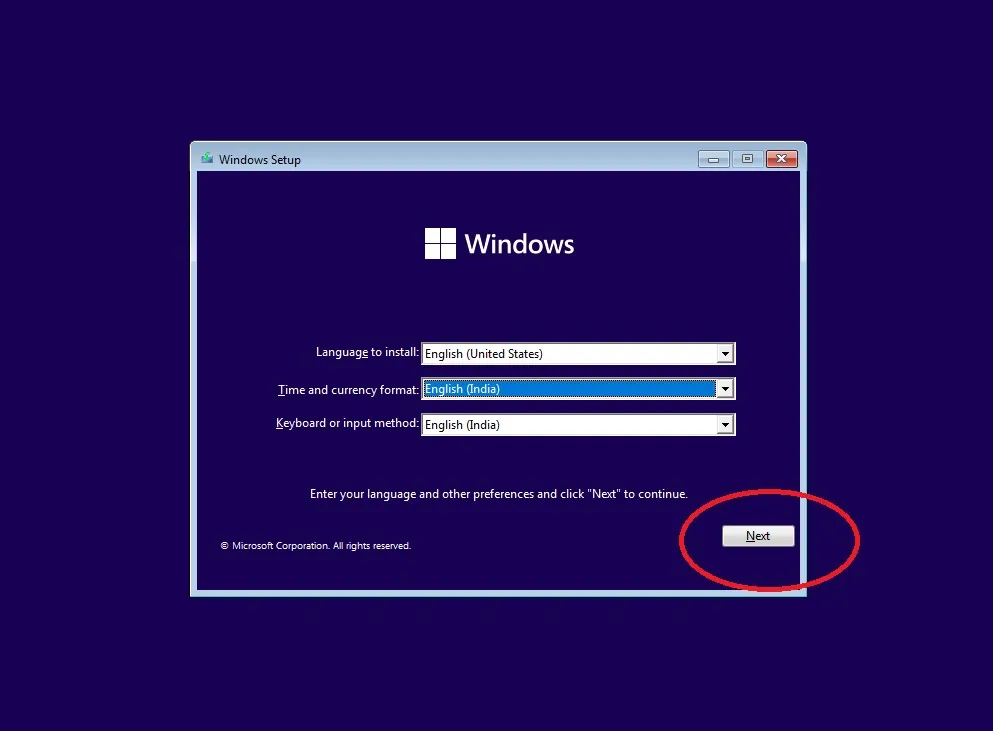
- 7. You can chose the time and currency format from here or leave it as it is.
- 8. Click on “Next”.
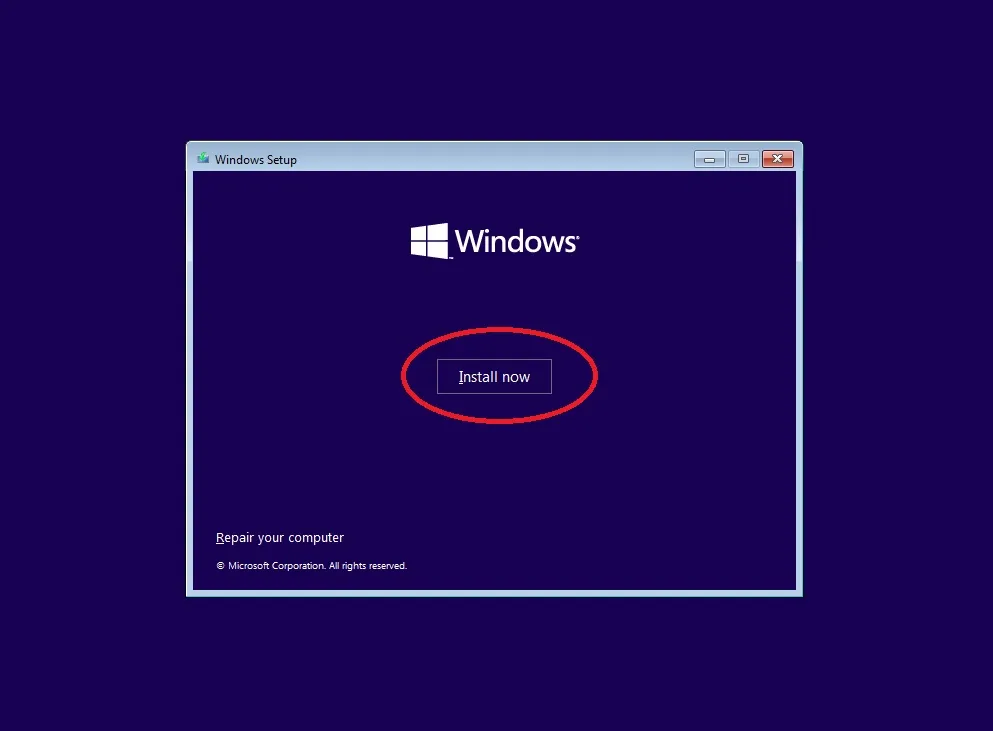
- 9. Click on “Install now”.
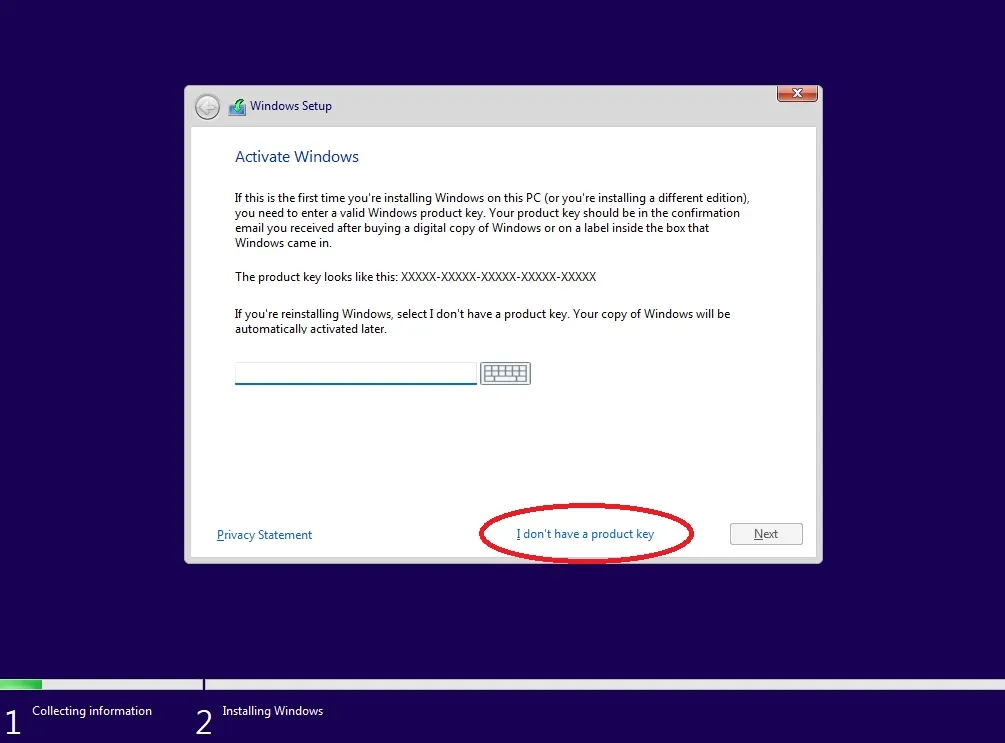
- 10. If you have a genuine product key then enter it else click on “I don’t have a product key” .
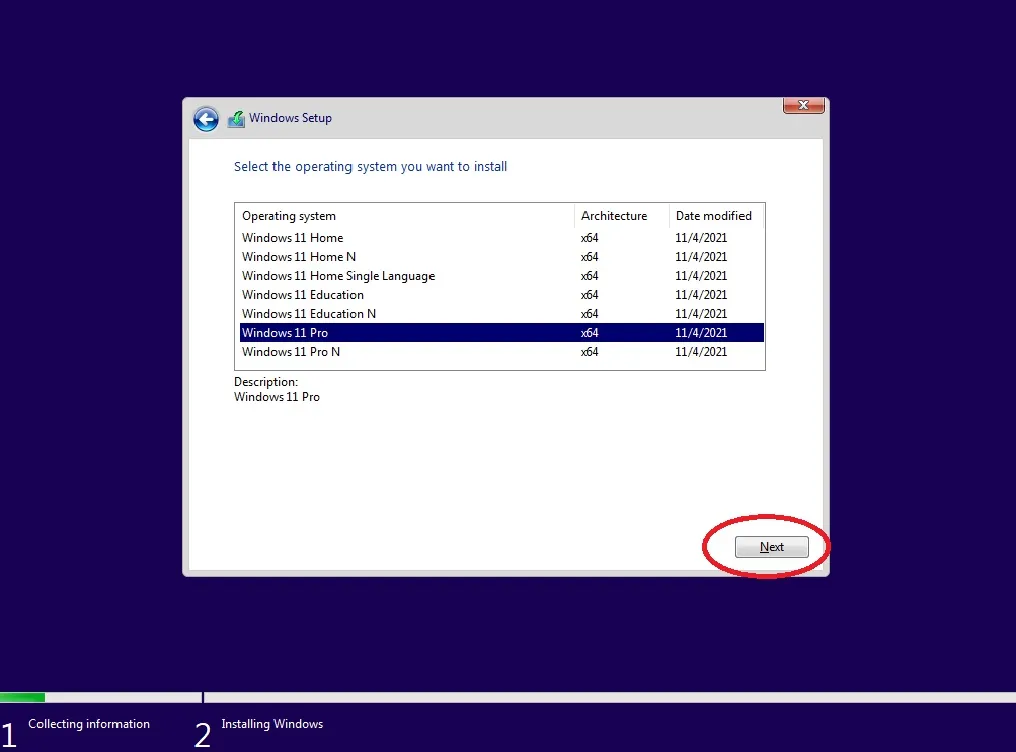
- 11. Chose the version of windows (Preferred : Windows 11 Pro) and click on “Next”.
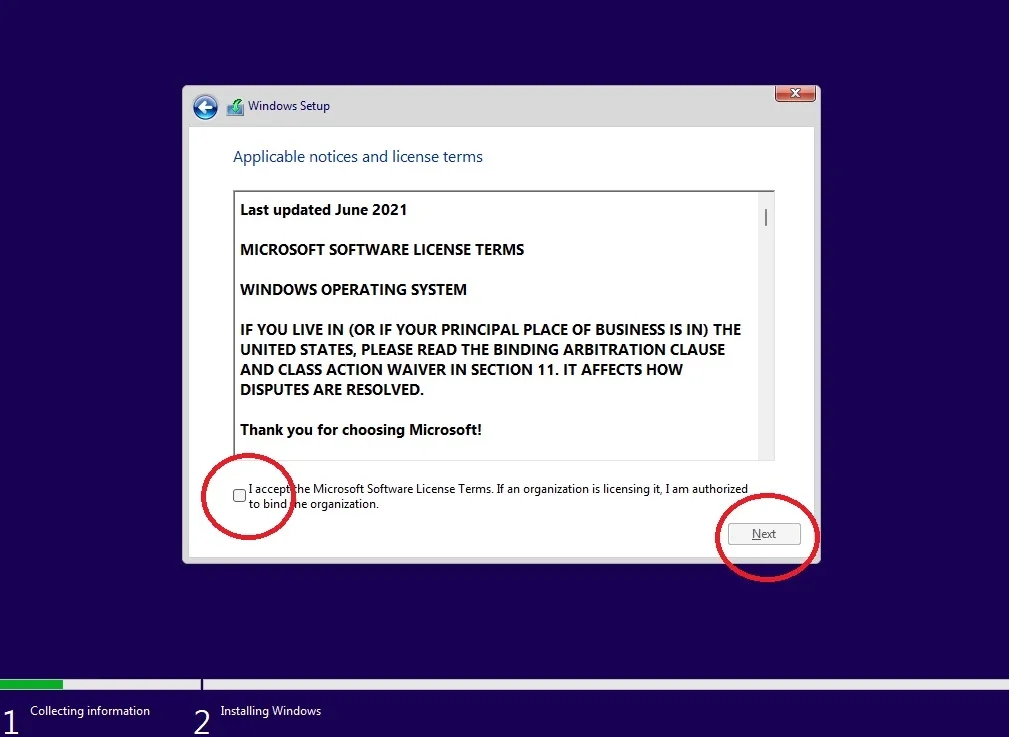
- 12. Mark on “I accept ………..” and click on “Next”.
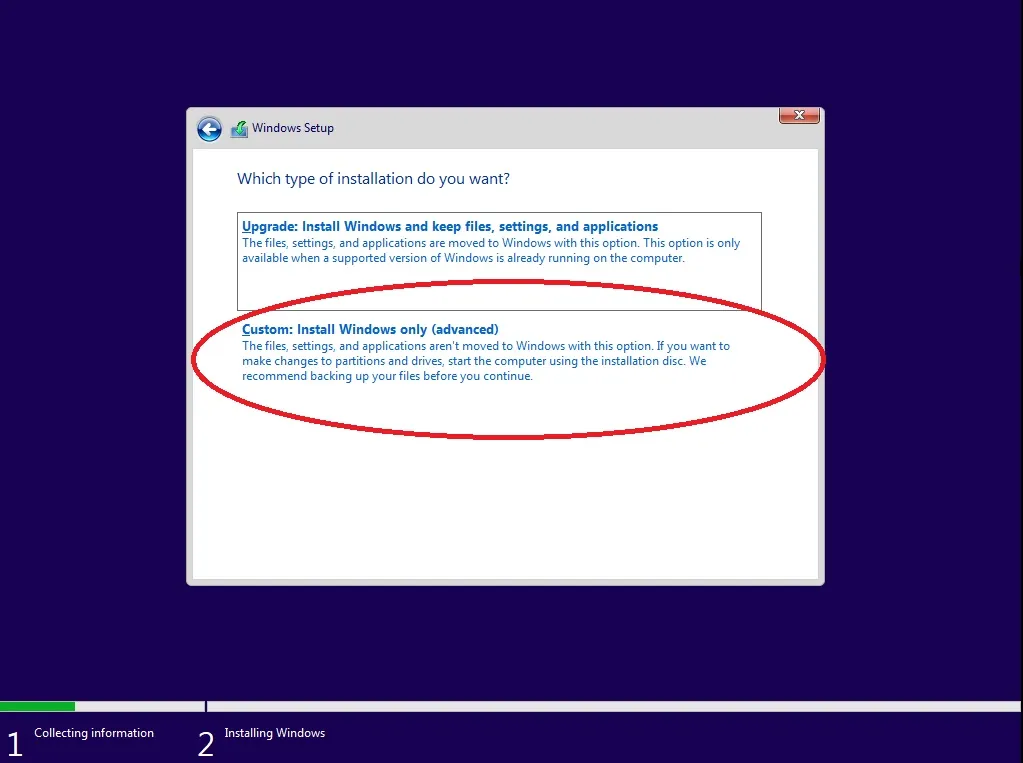
- 13. Chose the ” Custom: Install Windows only (advanced)” option.
- 14. If its a old pc then you can delete all the Hard Disk partition and create it newly.
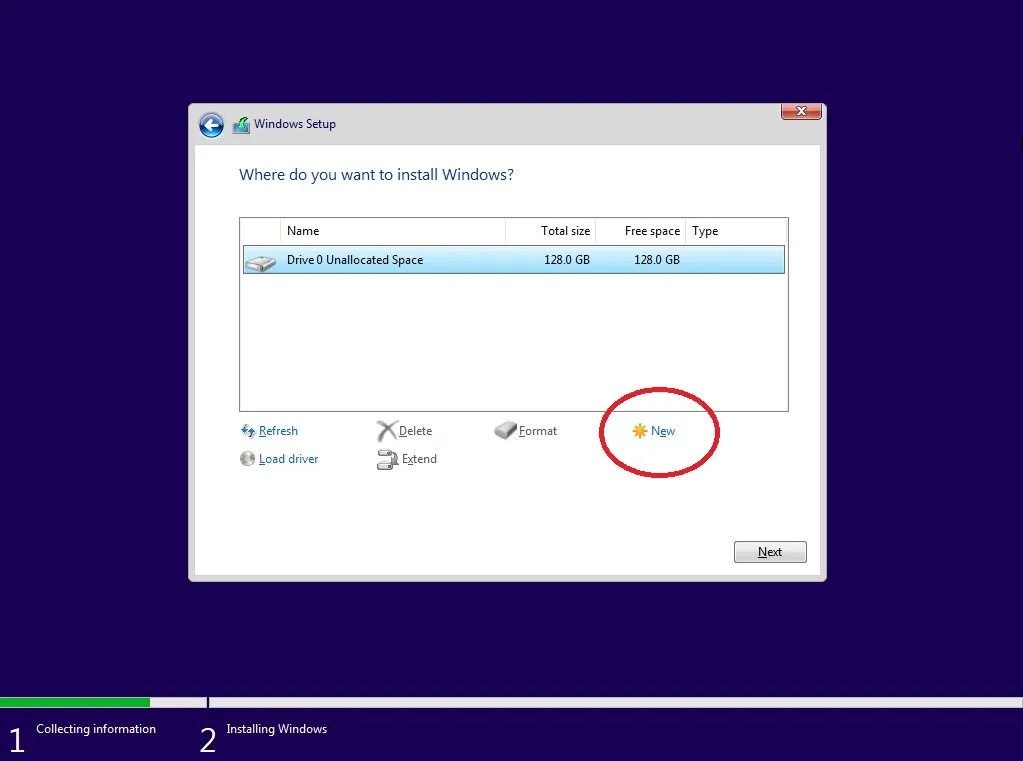
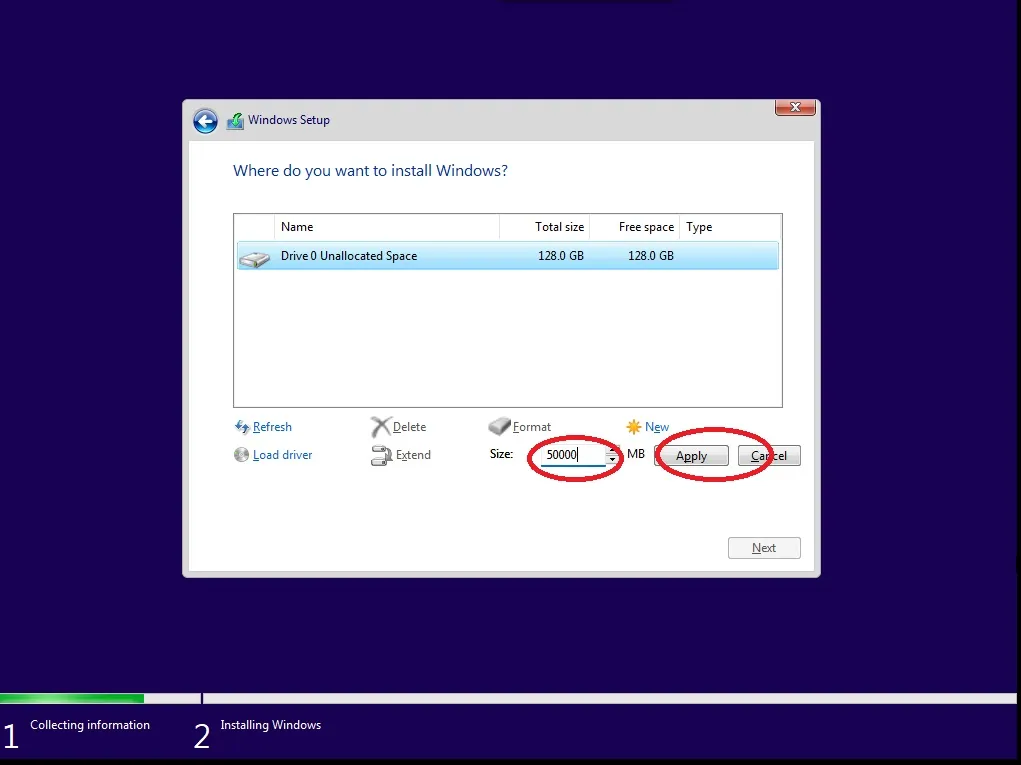
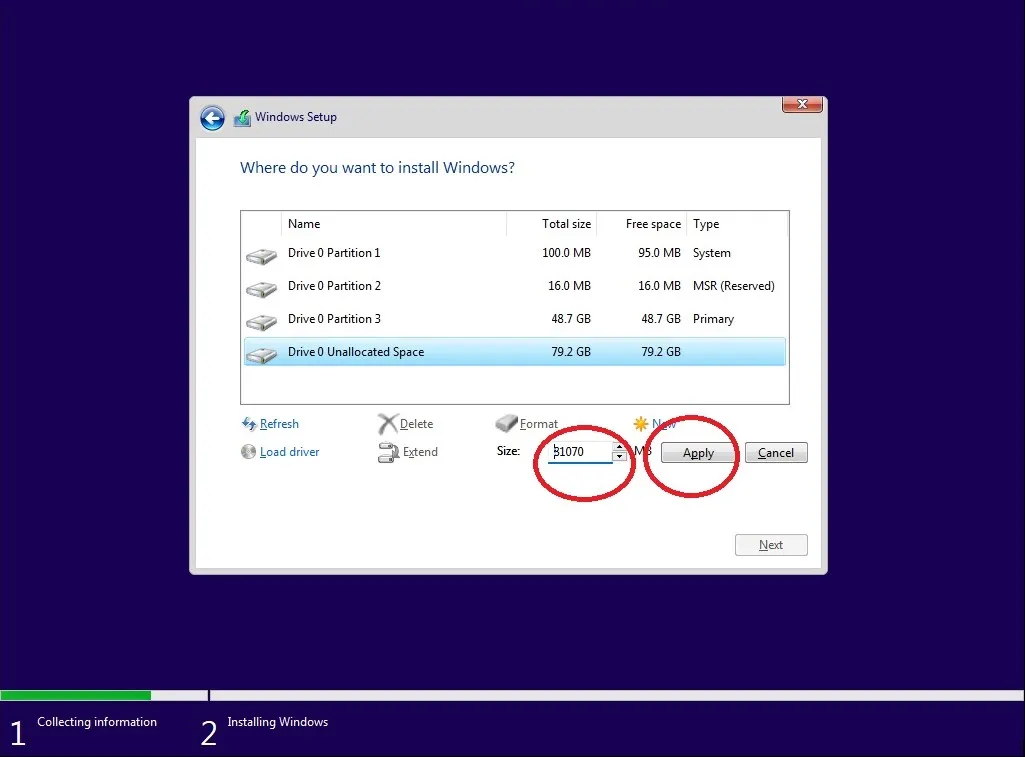
- 15. Select the HDD/ SSD and click on “New”.
- 16. Enter the size of 1st partition and click on “Apply”.( That will be the installation partition. Preferred minimum size 50GB= 50000MB approx.)
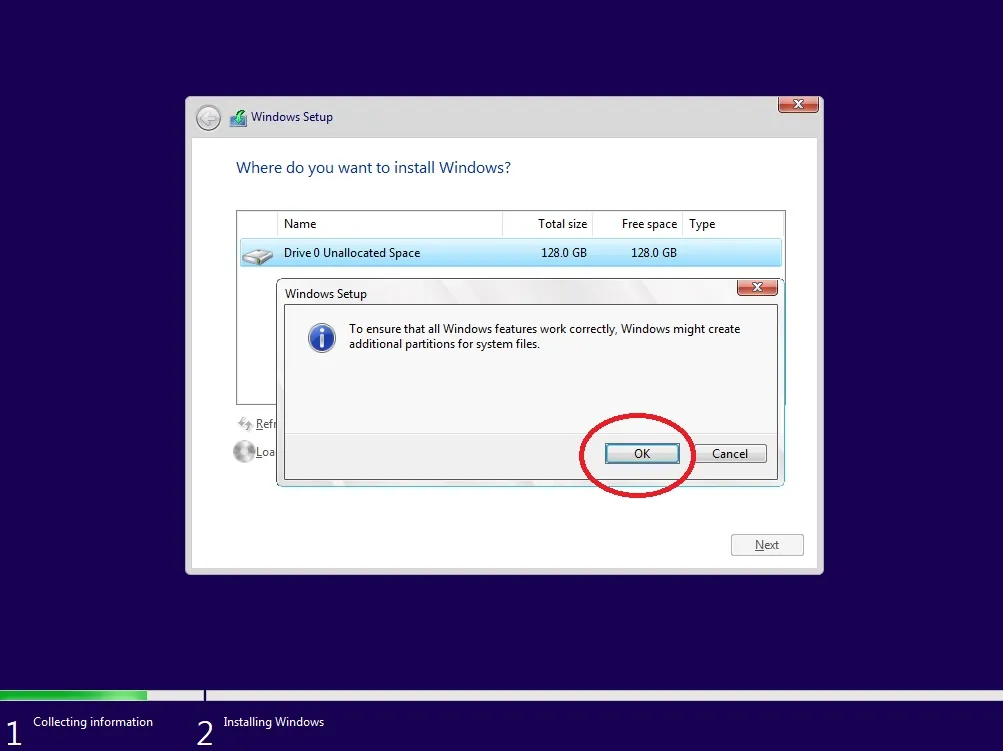
- 17. Click on “OK”.
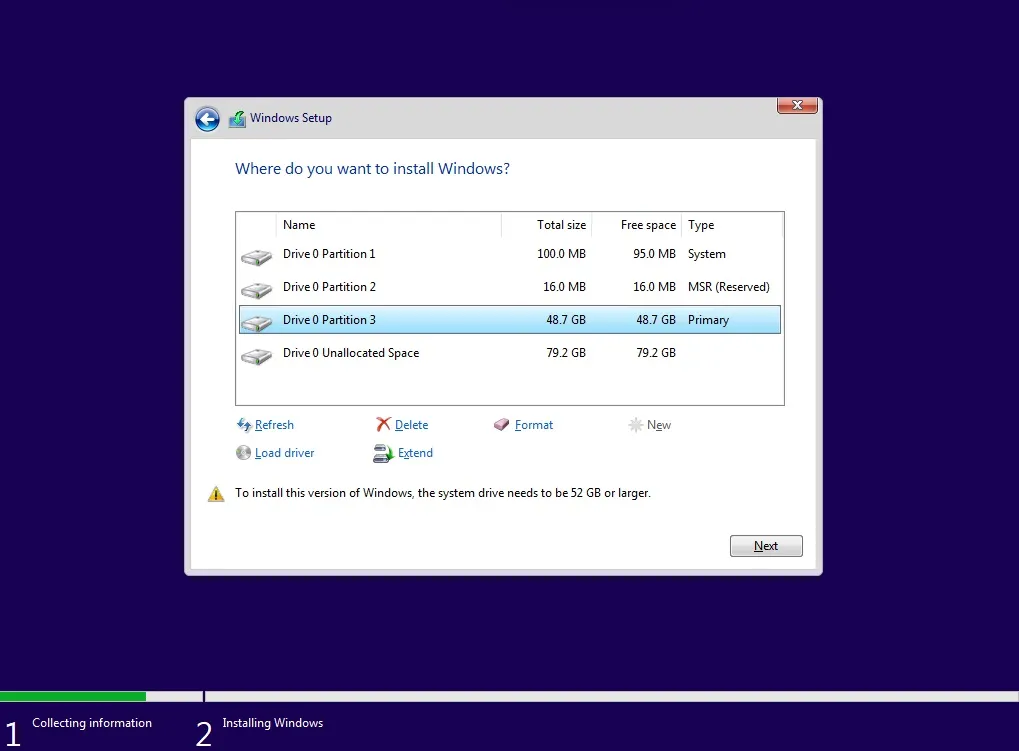
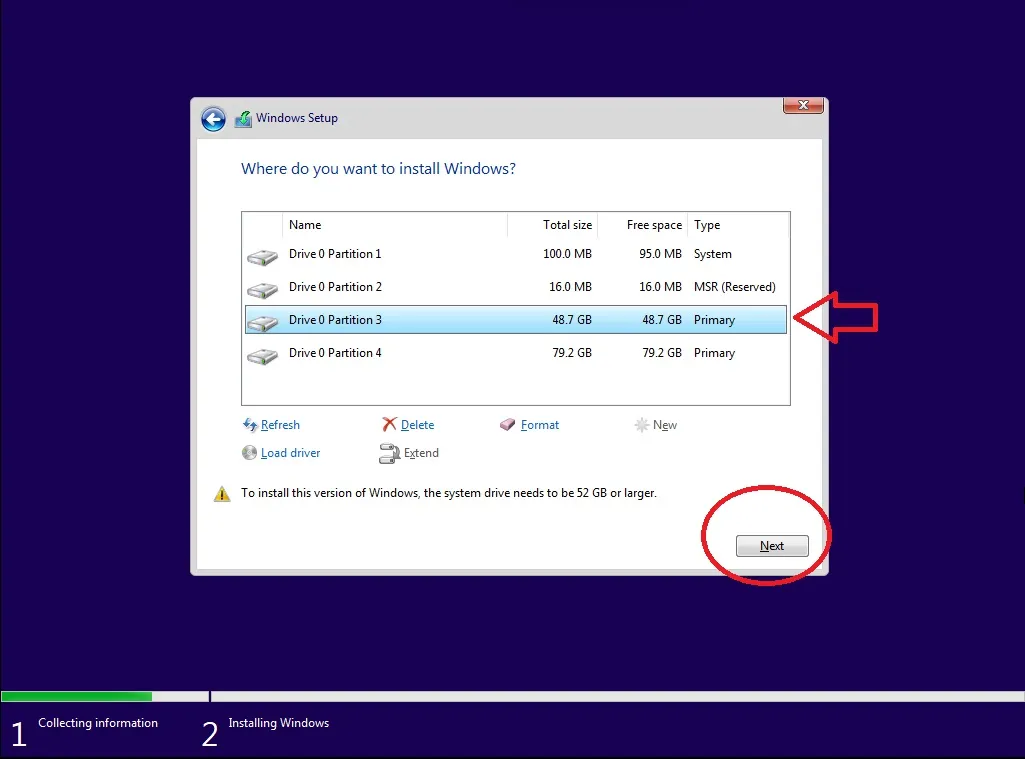
- 18. Its created 3 Partition automatically (System , MSR , Primary).
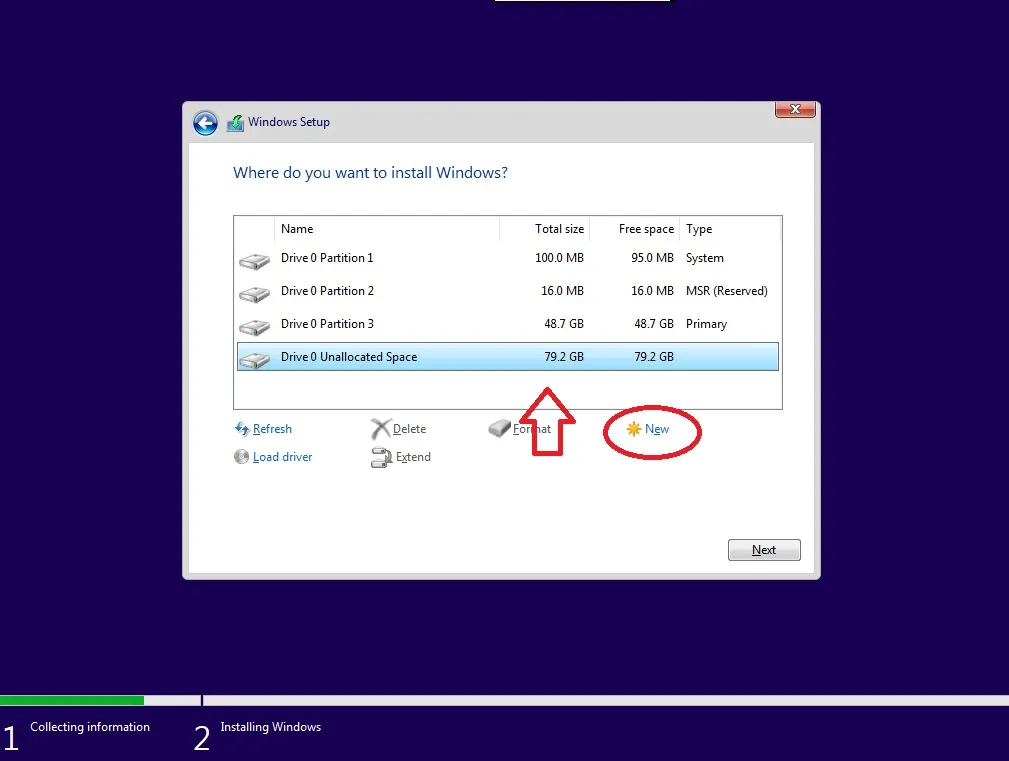
- 19. Select the Unallocated space of HDD/SSD and click on “New”.
- 20. As previous enter the value(MB) of partition and click on “Apply” to create a new partition.
- 21. Select the firstly created primary partition (Disk0 Partition3) and click on “Next”.
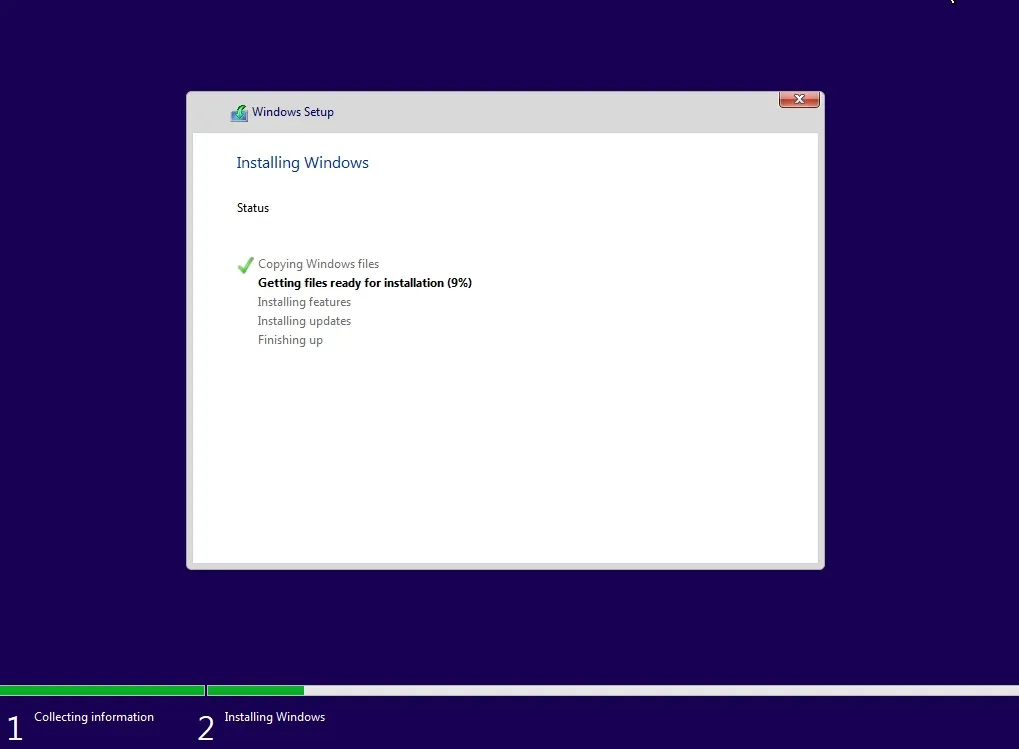
- 22. Installation is started and its looks like below.
- 23. If all is done well then its ask for restart.
- 24. Unplug the WINDOWS 11 Bootable Pen drive from PC.
- 25. After restarting it boot from HDD/SSD automatically.( assuming you unplugged the pen drive previously)
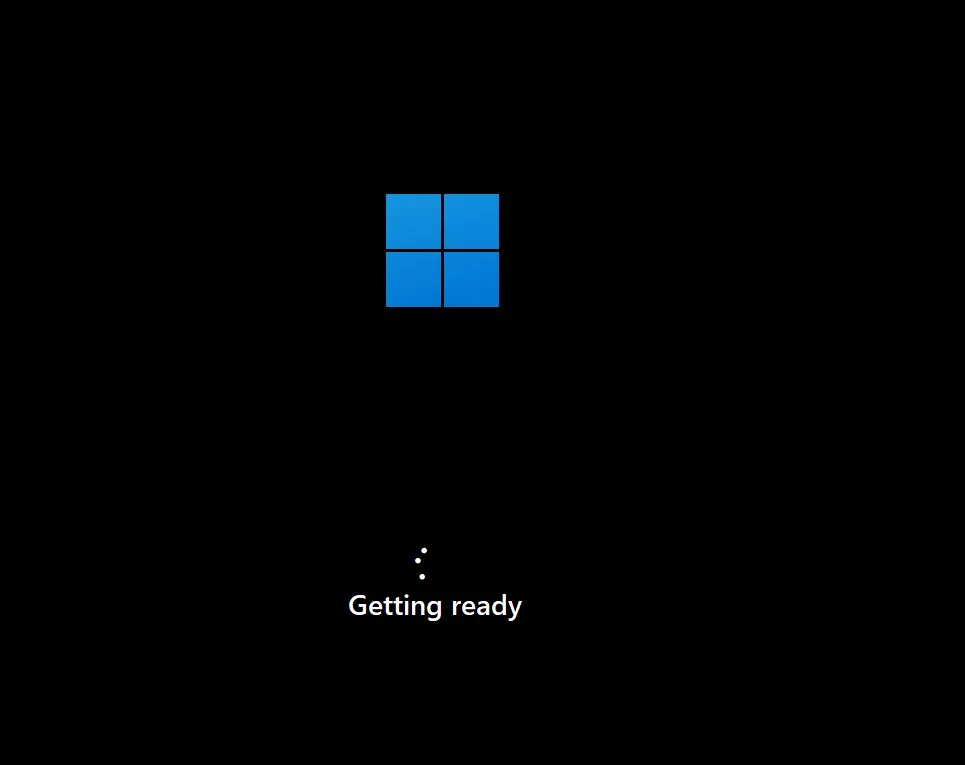
- 26. Wait for some times for next window.
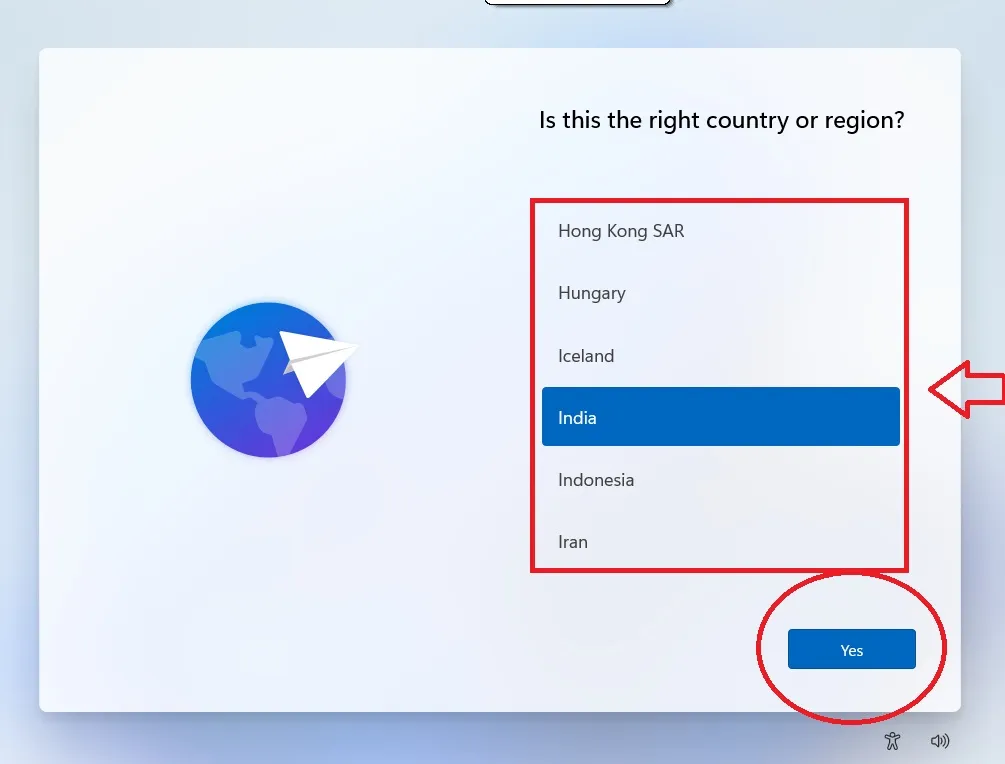
- 27. Select your country or region (here I select India) and click on “Next”.
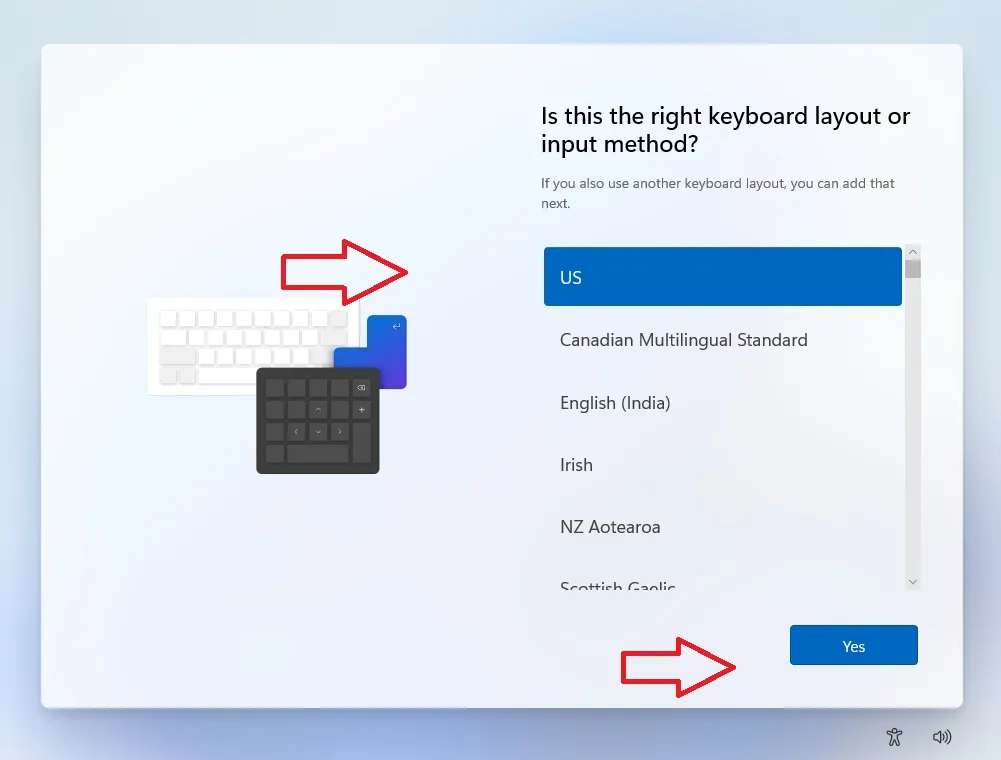
- 28. Here you chose your keyboard layout and click on “Next”.
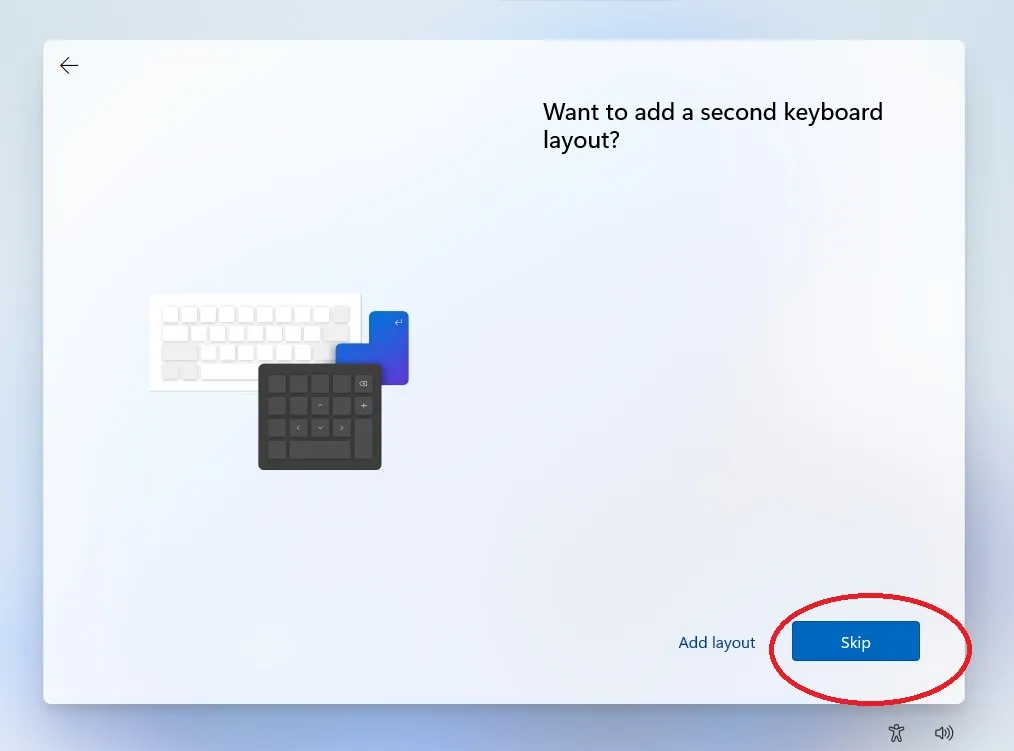
- 29. Click on “Skip” button.
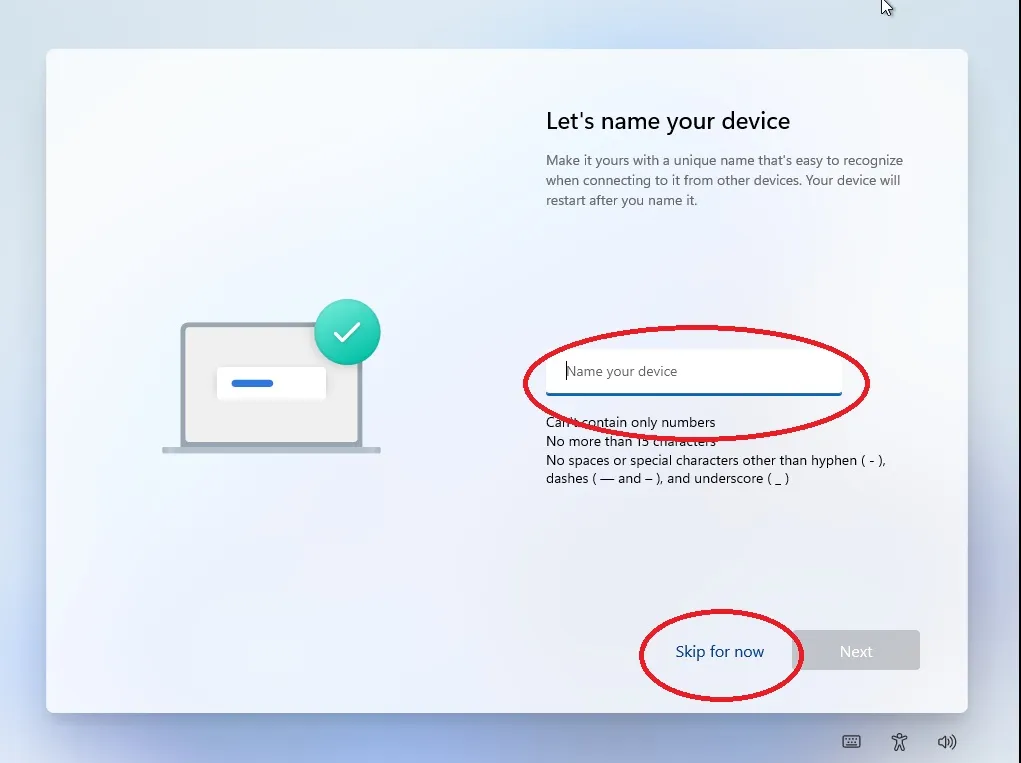
- 30. You can enter your device name manually from here or click on “Skip for now” option.
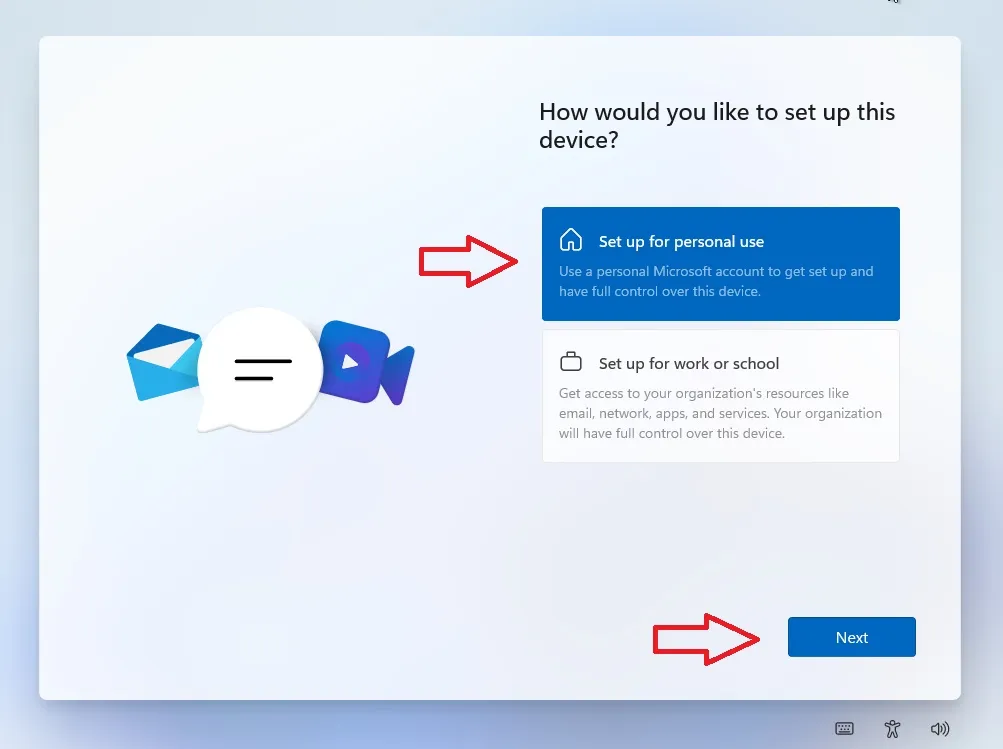
- 31. Select ” Setup for personal use” and click on “Next” .
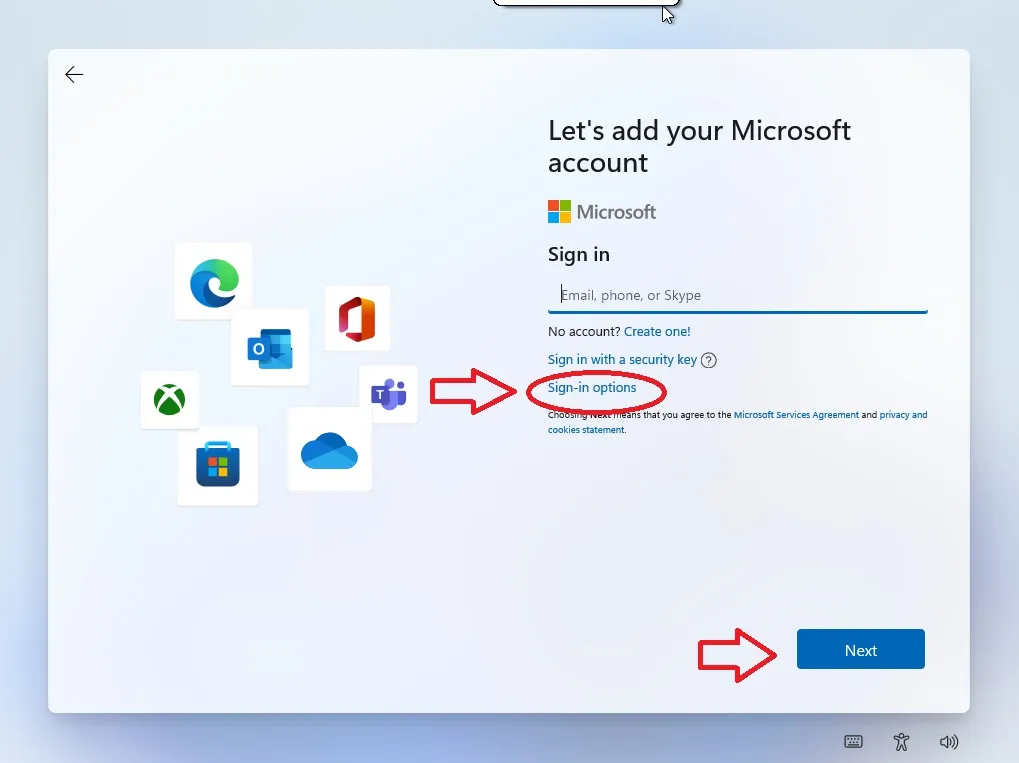
- 32. If you have a Microsoft email ID you can enter here and click on “Next” else click on “Sign-in options” for create an OFFLINE USER.
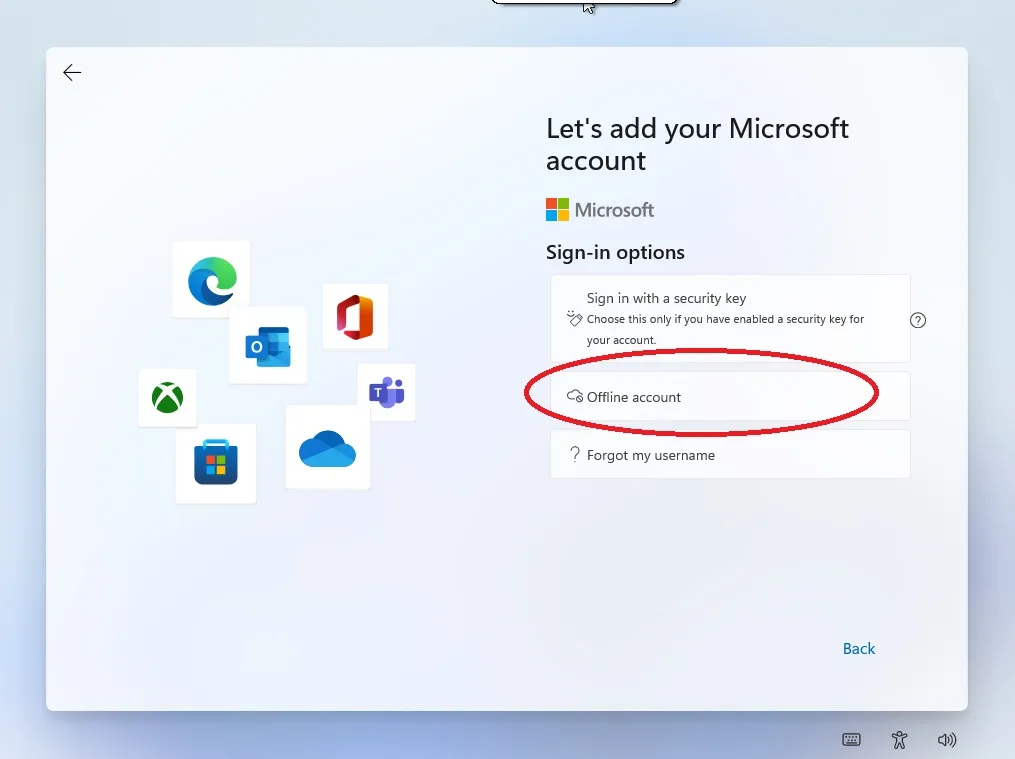
- 33. I think you chose offline mode … then simply click on “Offline account” as below.
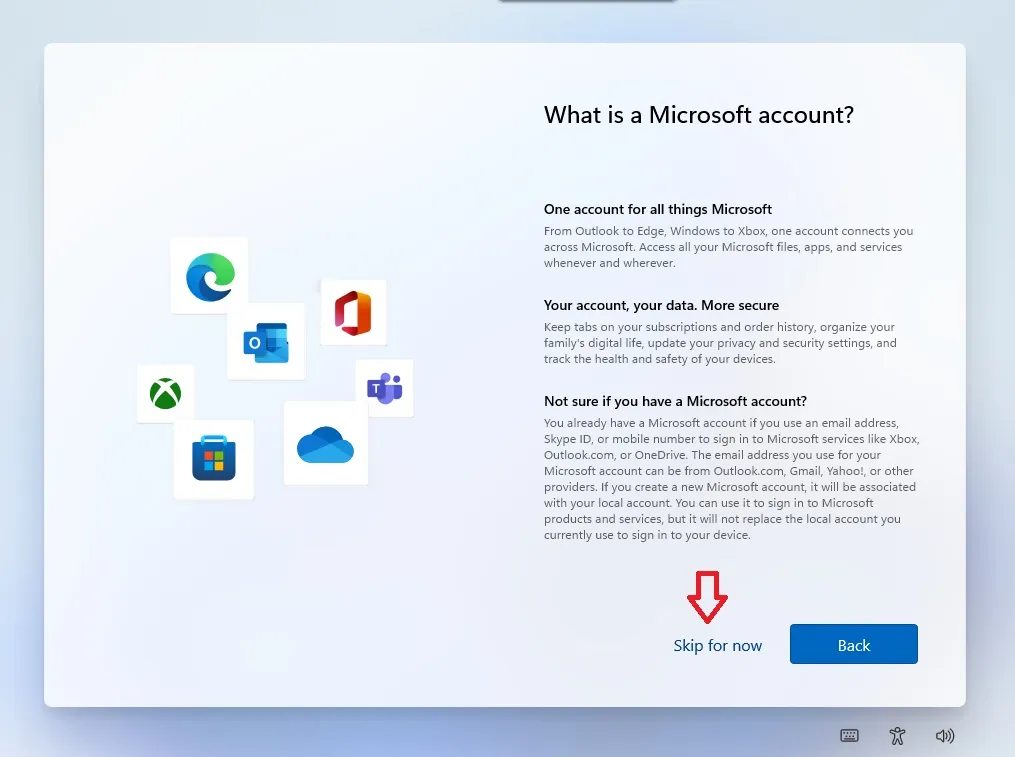
- 34. Click on “Skip for now”.
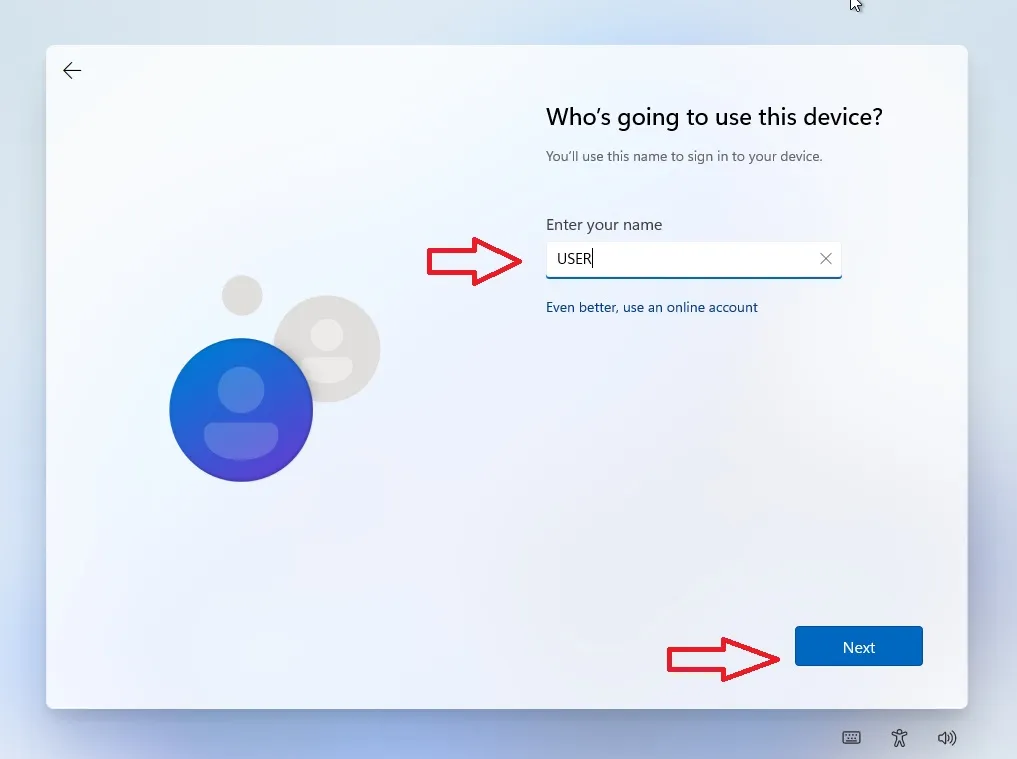
- 35. Enter Name for Offline User Name. Click on “Next” .
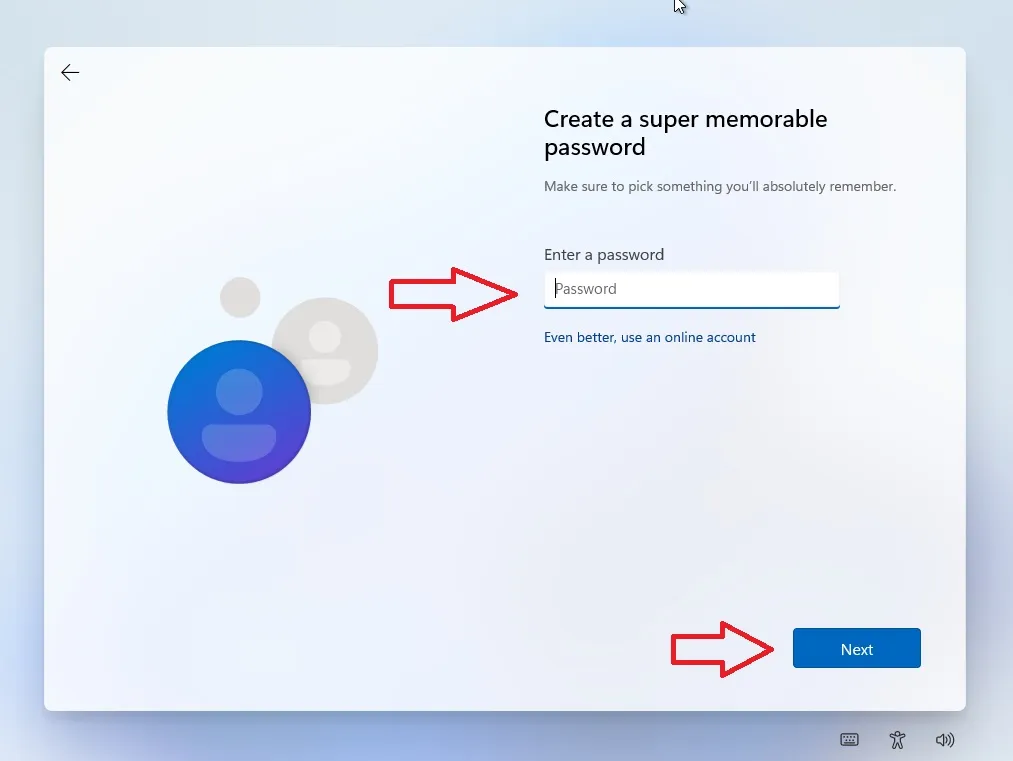
- 36. You can create a password for your offline user by entering the password here else leave it as blank and click on “Next”.
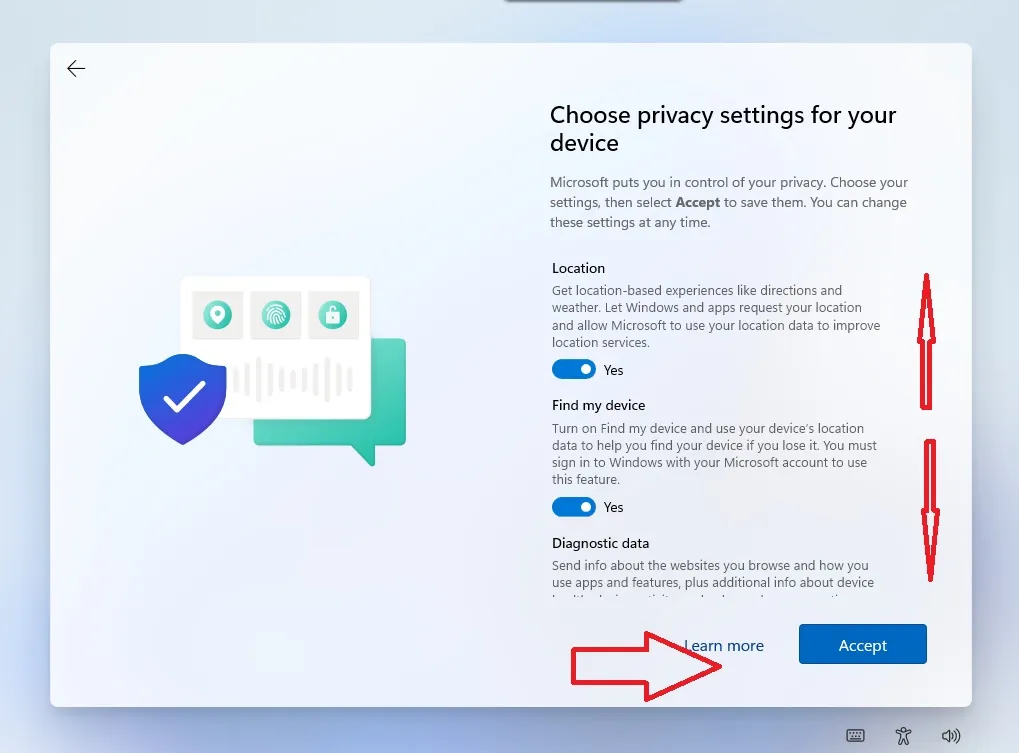
- 37. Scroll and check the privacy settings and click on “Accept”.
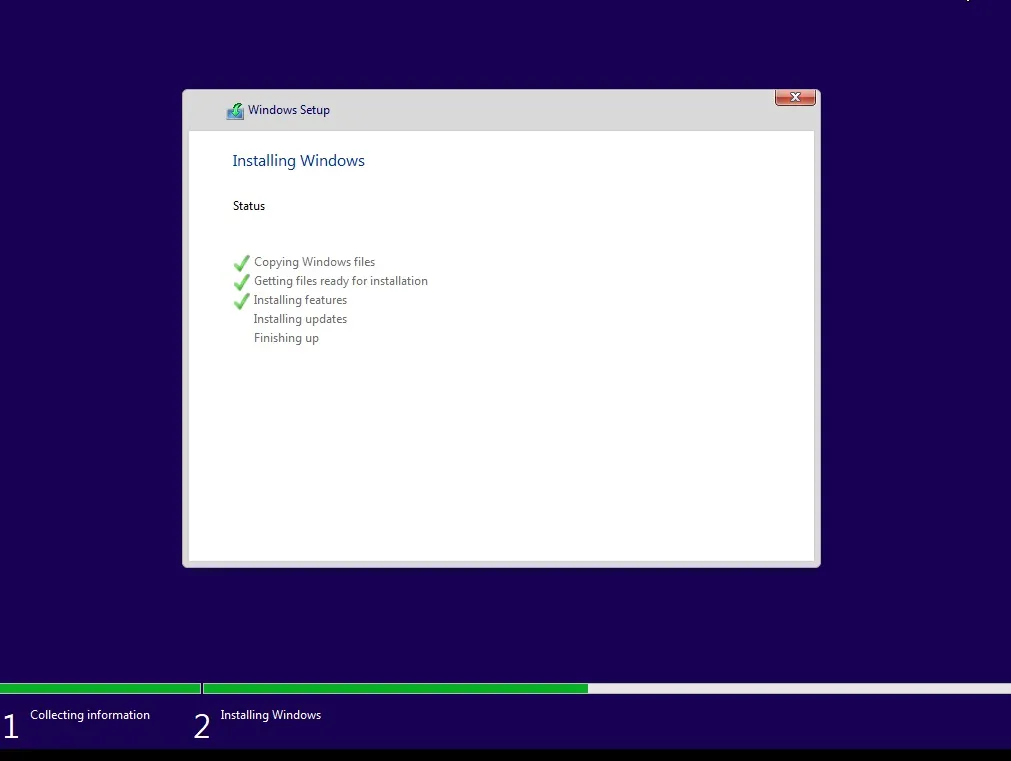
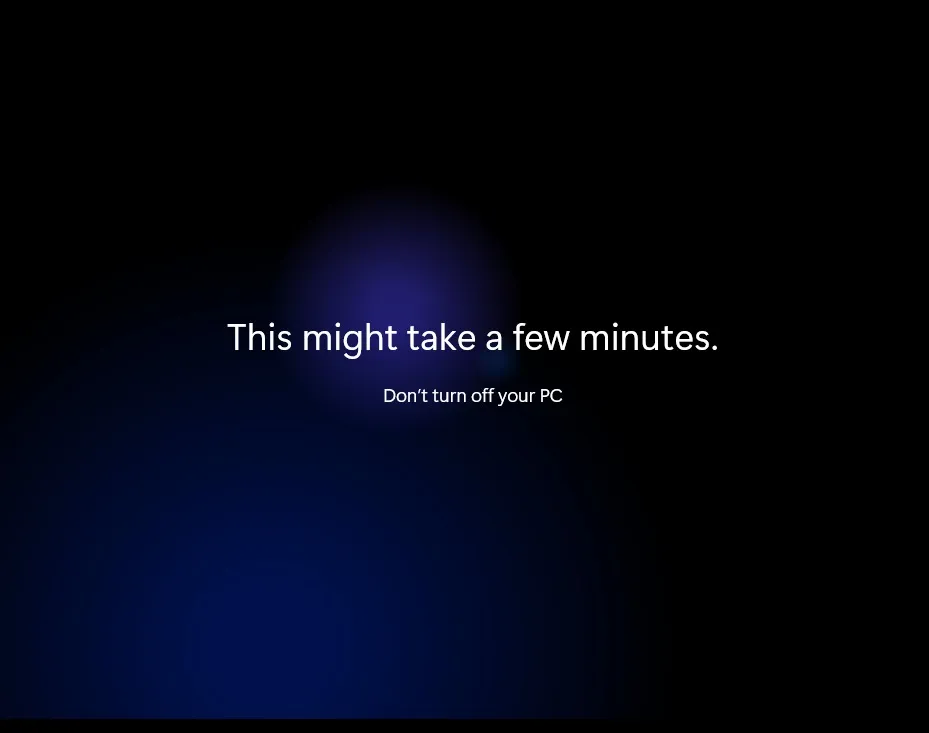
- 38. Almost done .. Windows is automatically install all the features and app for you.
- 39. Its take some times . Don’t worry wait for next Window.
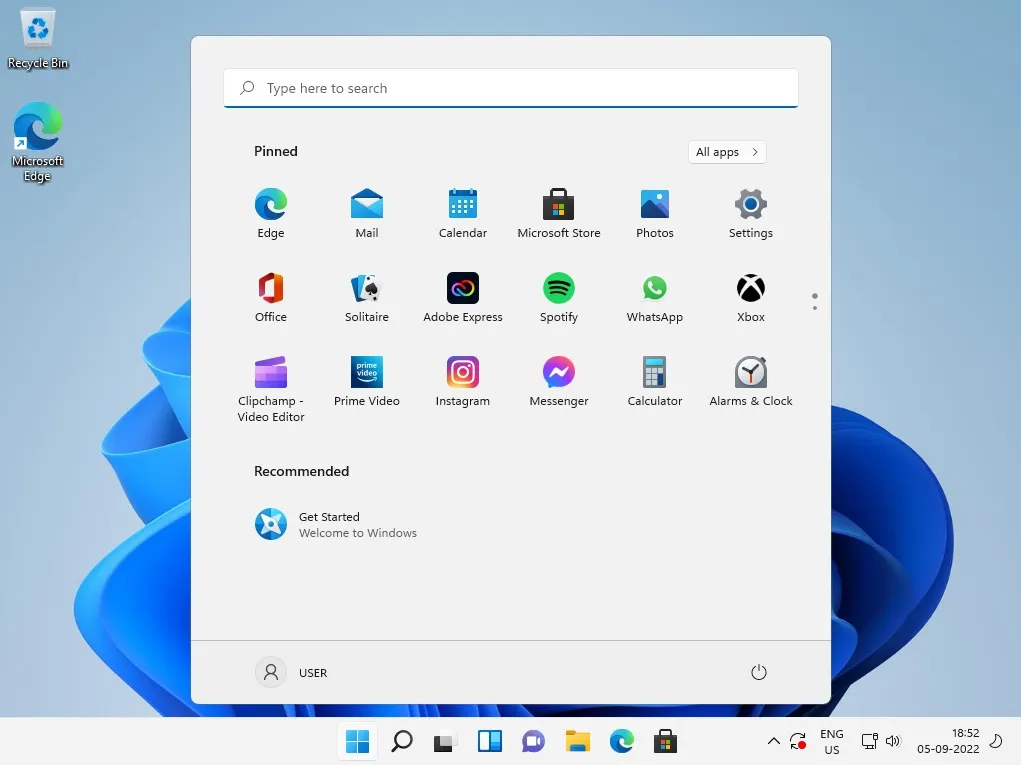
- 40. Its Done.. Your WINDOWS 11 PC is ready to use.



How to Upgrade Windows 10 PC to Windows 11 for free?
How to download Original Windows 11 iso?
How to Create a windows 11 bootable pen drive or usb disk?

